A damaged roof vent cap can lead to water damage, pest infestations, and poor ventilation in your home. When you notice cracks, rust, or missing pieces on your roof vent cap, it’s time to take action before small problems become costly repairs.
Whether you’re dealing with a broken plastic cap or a rusted metal one, replacing it yourself can save you money and protect your home from the elements. Our team at Best Exteriors has helped countless homeowners in Columbus tackle this common roofing issue with confidence.
This comprehensive guide will walk you through everything you need to know about replacing your roof vent cap safely and effectively. Here’s what we’ll cover:
- Why roof vent cap maintenance is crucial for your home’s health
- A complete step-by-step replacement process
- Essential tools and materials you’ll need
- Safety considerations and when to call professionals
- Tips for choosing the right replacement cap
🏠 Why Roof Vent Cap Replacement Is Important
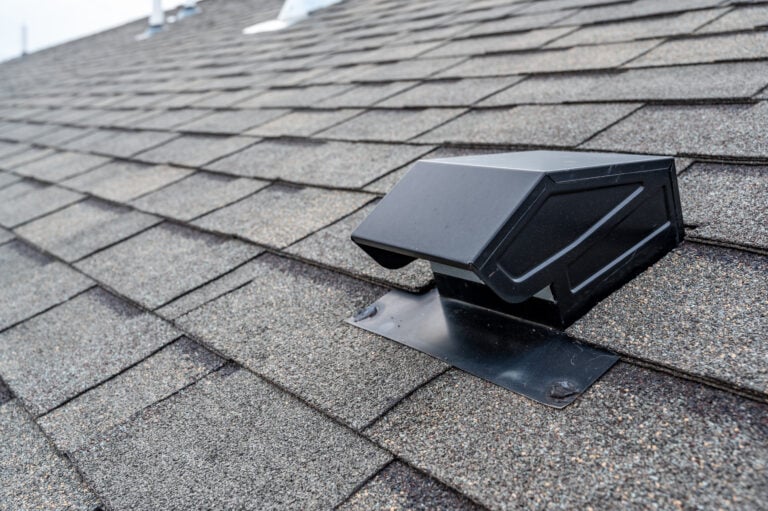
Your roof vent cap serves as the first line of defense against weather, animals, and debris entering your ventilation system. When this small but mighty component fails, it can create a cascade of problems throughout your home.
A properly functioning roof vent cap protects your investment in several key ways:
- Prevents water damage: Stops rain, snow, and ice from entering your attic and causing structural damage
- Blocks pests: Keeps birds, squirrels, and insects from nesting in your ventilation system
- Maintains proper airflow: Ensures your home’s ventilation system works efficiently
- Protects against debris: Prevents leaves, branches, and other materials from clogging your vents
- Saves energy costs: Proper ventilation helps regulate temperature, reducing heating and cooling expenses
- Prevents mold growth: Good ventilation reduces moisture buildup that can lead to mold and mildew
🔧 7 Steps To Replace Your Roof Vent Cap
Replacing a roof vent cap is a manageable DIY project for most homeowners with basic tools and safety knowledge. Follow these detailed steps to complete the job safely and effectively.
1. Gather Your Tools and Materials
Before you start replacing your roof vent cap, it’s essential to gather all the tools and materials you’ll need. Having everything ready beforehand will save you time and make the process smoother and safer. Preparation is key to a successful installation.
- Measure the existing vent cap: Use a tape measure to get the exact dimensions of your current vent cap. Double-check these measurements to ensure you purchase a replacement that fits properly.
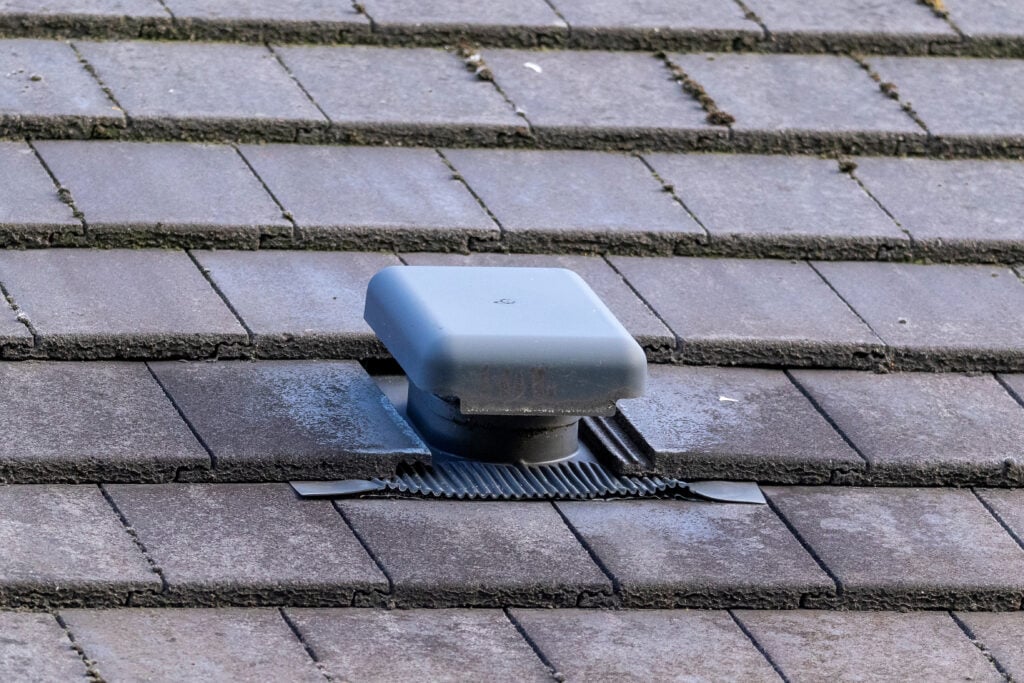
- Buy the right replacement cap: Choose a vent cap that is compatible with your roof type (e.g., shingle, metal, or tile) and suited for your climate. For example, in areas prone to heavy rain or snow, consider a cap designed for extra weather resistance.
- Gather necessary tools and supplies: Common tools include a screwdriver, pry bar, caulk gun, ladder, safety harness, gloves, and weatherproof caulk. Having everything ready avoids unnecessary trips back and forth during the job.
2. Choose the Right Weather Conditions
The timing of this project is crucial. Working on a roof can be dangerous if conditions aren’t ideal, so plan accordingly to ensure your safety and the quality of the installation.
- Pick a clear, dry day: Check the weather forecast and choose a day with sunny or overcast skies and no rain. Avoid windy conditions, as gusts can make roof work risky.
- Avoid slippery surfaces: Never attempt roof work if the surface is wet from rain, dew, or ice. Slippery surfaces increase the chances of accidents, so wait until the roof is completely dry before starting.
- Work during daylight hours: Ensure you have plenty of daylight to complete the job. Working in dim light can lead to mistakes, missed steps, or unsafe conditions.
3. Set Up Your Safety Equipment
Safety should always be your top priority when working on a roof. Properly setting up your safety gear can prevent accidents and give you peace of mind throughout the project.
- Use a sturdy ladder: Select a ladder that’s tall enough to reach your roof comfortably. Secure it on even ground, and have someone hold the base to stabilize it while you climb.
- Wear non-slip footwear: Choose shoes with strong traction to help you maintain a firm grip on the roof surface. Avoid flip-flops, sandals, or any footwear that could lead to slips.
- Secure a safety harness: If your roof is steep or elevated, a safety harness is essential. Anchor it securely to a stable point on the roof to prevent falls.
- Use gloves and protective gear: Gloves will protect your hands from sharp edges, screws, and caulk, while glasses or goggles can shield your eyes from debris.
4. Remove the Old Vent Cap
Before installing the new vent cap, you’ll need to carefully remove the old one. Take your time to avoid damaging the surrounding roof or vent opening.
- Examine how it’s attached: Look closely at the fasteners securing the old vent cap. Most caps are attached with screws, nails, or caulk. Note the attachment method so you can remove it without causing damage.
- Remove fasteners: Use a screwdriver or pry bar to take out nails or screws holding the old cap in place. Work slowly and carefully to avoid puncturing or tearing the roof material.
- Clean the vent opening: Once the old cap is removed, clear away any remaining caulk, sealant, or debris from the vent opening. A clean surface ensures a better fit for the new cap and creates a more secure seal.
5. Inspect the Vent Opening
With the old cap removed, take a moment to thoroughly inspect the vent opening and the surrounding area. This step allows you to catch any issues that could affect the new installation.
- Check for damage: Look for cracks, rust, warping, or other signs of wear around the vent opening. These issues could compromise the seal of your new cap if left unaddressed.
- Make necessary repairs: Replace damaged roofing material, seal any cracks, or patch holes before proceeding. A solid, clean surface is essential for a secure and weatherproof installation.
- Verify ventilation efficiency: Ensure the vent opening is clear of obstructions, such as dirt, leaves, or nests, to allow proper airflow.
6. Install the New Vent Cap
With the vent opening prepared, you’re ready to install the new vent cap. This step requires precision to ensure the cap is properly secured and weatherproofed.
- Position the new cap: Place the cap over the vent opening, ensuring it fits snugly and aligns with the existing structure. Adjust it as needed for the best fit.
- Secure the cap: Use screws, nails, or the recommended fasteners to attach the cap firmly in place. Follow the manufacturer’s instructions to ensure it’s anchored securely.
- Apply weatherproof caulk: Seal around the edges of the cap with weatherproof caulk to prevent leaks. Use a caulk gun to apply a smooth, even bead, and check for any gaps or weak spots.
7. Test and Final Inspection
Once the new vent cap is installed, take time to confirm that everything is secure and functioning properly. A quick inspection now can save you from future problems.
- Check for stability: Gently tug on the cap to ensure it’s firmly attached and won’t shift or loosen in high winds.
- Verify airflow: Confirm that the vent cap allows air to flow freely while keeping out debris, pests, and moisture.
- Inspect the seal: Examine the caulk around the edges to ensure there are no gaps or cracks that could allow water to seep in.
- Clean up: Remove any tools, materials, or debris from the roof and surrounding area. Safety and cleanliness are just as important at the end of the job.
By following these steps thoroughly, you’ll ensure your new roof vent cap is installed safely, securely, and ready to withstand the elements for years to come.
⚠️ Safety Considerations and Professional Help
While replacing a roof vent cap can be a DIY project, certain situations call for professional expertise. Knowing when to call in the experts can save you from injury and costly mistakes.
When To Call a Professional
Sometimes the smartest choice is to leave roof work to trained professionals who have the right equipment and experience.
- Height and Roof Pitch: Steep roofs or those more than one story high present significant safety risks. Professional roofers have specialized equipment and training to work safely at heights.
- Structural Damage: If you discover rot, structural damage, or extensive repairs needed around the vent area, it’s best to have a professional assess the situation.
- Multiple Repairs Needed: When several vent caps need replacement or you’re dealing with other roofing issues simultaneously, professional service ensures everything is done correctly.
Safety Equipment Essentials
If you decide to proceed with DIY replacement, invest in proper safety equipment. Your safety is worth more than the cost of quality gear.
- Ladder Safety: Use a ladder that extends at least three feet above the roof line. Have someone spot you and never work alone on roof projects.
- Personal Protective Equipment: Wear non-slip shoes, safety glasses, and work gloves. Consider using a safety harness for added protection.
Weather Awareness
Weather conditions can change quickly and create dangerous situations for roof work. Always check the forecast before starting your project.
- Wind Conditions: Even moderate winds can make roof work hazardous. Avoid working in winds over 15 mph or when gusts are expected.
- Temperature Considerations: Extreme temperatures can make roofing materials brittle or slippery. Plan your work for moderate temperature days when possible.
💡 Take Action to Protect Your Home
Replacing your roof vent cap is a smart investment in your home’s protection and efficiency. This relatively simple maintenance task can prevent thousands of dollars in water damage and keep your ventilation system working properly for years to come.
Don’t wait until you see water stains on your ceiling or find animals nesting in your vents. Regular inspection and timely replacement of worn vent caps will keep your home safe and comfortable.
If you’re not comfortable handling this project yourself or discover additional roofing issues during your inspection, contact Best Exteriors today for professional assistance. Our experienced team serves Columbus and surrounding areas with reliable, high-quality roofing services that protect your most important investment.